
Sushi Rice is the foundation of great homemade sushi, and getting it right changes everything. After years of testing, this sushi rice recipe gives you glossy, tender, lightly sticky grains with the perfect balance of rice vinegar, sugar, and salt.
Then I did what I should have done at the beginning: I broke down the technique step by step and figured out exactly where I was going wrong. The answer turned out to be a combination of three things — the right rice, the right seasoning ratio, and the right method for cooling and folding. None of it is hard. All of it matters.
If you love easy Asian-inspired meals, pairing sushi rice with simple vegetable sides makes dinner feel instantly better. These Korean bok choy recipes work beautifully alongside sushi bowls, grilled salmon, or teriyaki chicken nights.
Here’s the recipe I’ve landed on after years of testing. It works every single time.
Why This Recipe Works
- Uses the exact seasoning ratio that gives restaurant-style sushi rice its tang and shine
- Works for any kind of sushi — rolls, nigiri, hand rolls, rice bowls
- The cooling method preserves the texture: each grain is distinct but sticky enough to hold shape
- No special equipment needed — just a rice cooker or pot and a wide bowl
What Makes Sushi Rice Different?
Sushi rice starts with short-grain Japanese rice (also labeled ‘sushi rice’ at grocery stores), which has a higher starch content than long-grain varieties. When cooked, the grains cling together naturally — that’s what you want.
The seasoning is what transforms plain cooked rice into sushi rice: a mixture of rice vinegar, sugar, and salt folded in while the rice is still hot. The vinegar adds acidity, the sugar rounds it out, and the salt ties everything together. The folding motion — not stirring — distributes the seasoning without breaking the grains or making the rice gluey.
Ingredients
Makes about 4 cups cooked sushi rice — enough for 4–6 rolls or 20 nigiri pieces:
For the Rice
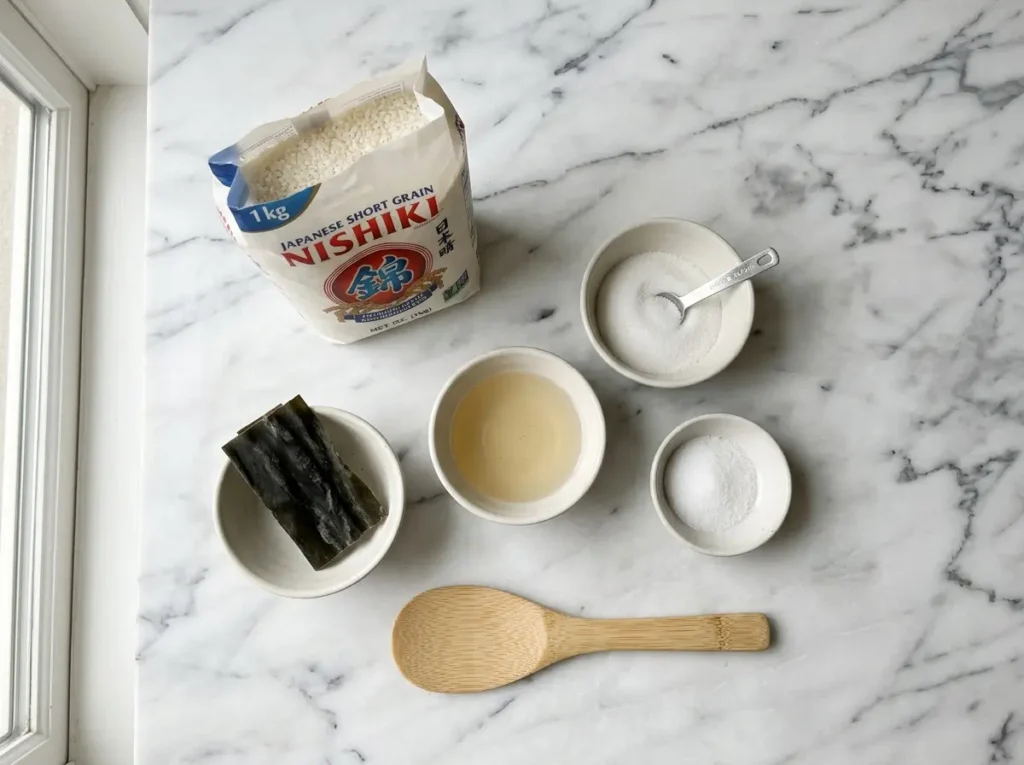
- 2 cups short-grain Japanese rice (sushi rice)
- 2 cups cold water
- 1 small piece of kombu (optional — a 2-inch square of dried kelp, adds umami depth)
For the Sushi Vinegar
- 4 tablespoons unseasoned rice vinegar
- 2 tablespoons granulated sugar
- 1½ teaspoons fine salt
Ingredient Notes
Rice: Short-grain Japanese rice only. Do not use long-grain, jasmine, or basmati rice — the starch content is wrong and the rice won’t have the right texture. Brands like Nishiki, Kokuho Rose, or Tamaki Gold are widely available in the US.
Rice vinegar: Use unseasoned rice vinegar (no added sugar or salt — that’s what ‘seasoned’ means). We’re adding our own sugar and salt in the right proportions. I use Marukan or Mizkan brands. Note: rice vinegar is not the same as regular white vinegar — the flavor is much milder and slightly sweet.
Kombu: Completely optional but worth using if you can find it. It adds a subtle depth of flavor to the rice without being detectable as a specific flavor.
How to Make Sushi Rice
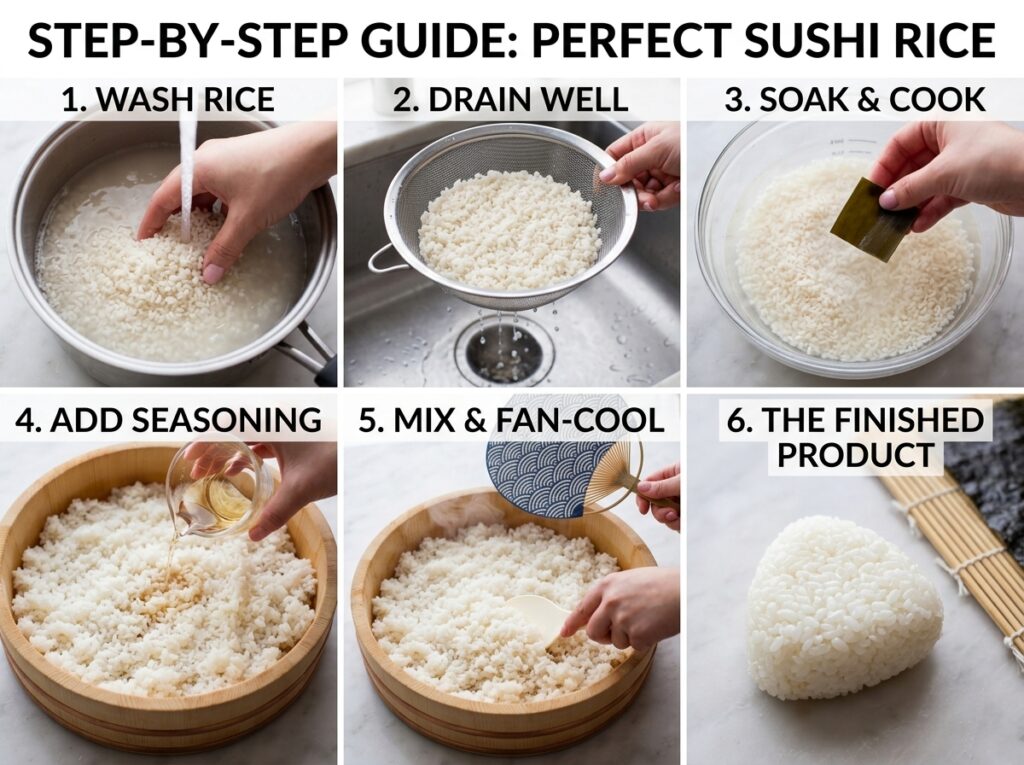
Step 1: Wash the Rice (Don’t Skip This)
Place the rice in a fine-mesh strainer or bowl and rinse under cold water, swirling with your hand, until the water runs almost clear — about 3–4 rinses. This removes excess surface starch, which is what makes rice gluey rather than sticky. Pour off the cloudy water each time and add fresh. The water won’t run completely clear — a slight cloudiness is fine.
Step 2: Soak (Optional but Recommended)
After rinsing, let the rice soak in clean cold water for 30 minutes. This helps the grains cook evenly all the way through. Skip if you’re in a hurry — it’s optional.
Step 3: Cook the Rice
Rice cooker method (recommended): Add drained rice and 2 cups fresh cold water to the cooker. Add kombu if using. Cook on the white rice setting. When done, let it steam on warm for 10 minutes before opening.
Stovetop method: Combine drained rice, 2 cups water, and kombu (if using) in a heavy-bottomed pot with a tight-fitting lid. Bring to a boil over medium heat. As soon as it boils, reduce heat to the lowest setting, cover, and cook for 13 minutes. Remove from heat and steam covered for 10 more minutes. Don’t lift the lid during cooking.
Step 4: Make the Sushi Vinegar
While the rice cooks, combine the rice vinegar, sugar, and salt in a small saucepan over low heat. Stir until the sugar and salt dissolve completely — about 1–2 minutes. Don’t boil. Remove from heat and let cool.

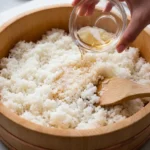
Step 5: Season and Cool the Rice
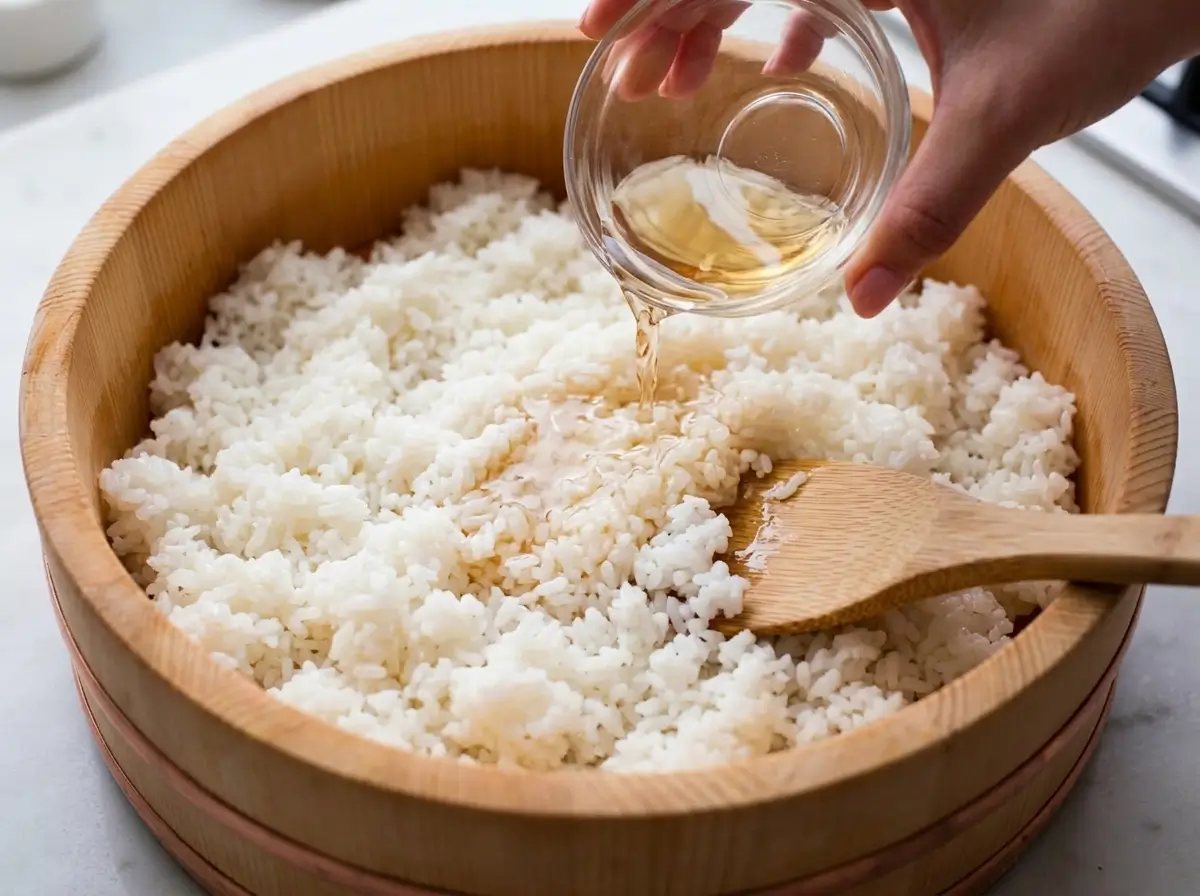
This is the most important step. Remove the kombu from the cooked rice. Transfer the hot rice to a large, wide, non-metallic bowl (a wooden salad bowl works well — wood absorbs excess moisture).
Pour the sushi vinegar evenly over the hot rice. Using a rice paddle or wide spatula, fold the vinegar into the rice using a slicing and turning motion — not a stirring motion. You’re distributing the vinegar without crushing the grains.
At the same time, fan the rice to cool it down. A handheld fan, a folded magazine, or even a piece of cardboard all work. The goal is to cool the rice to just above room temperature while folding — this is what gives it that characteristic glossy shine.
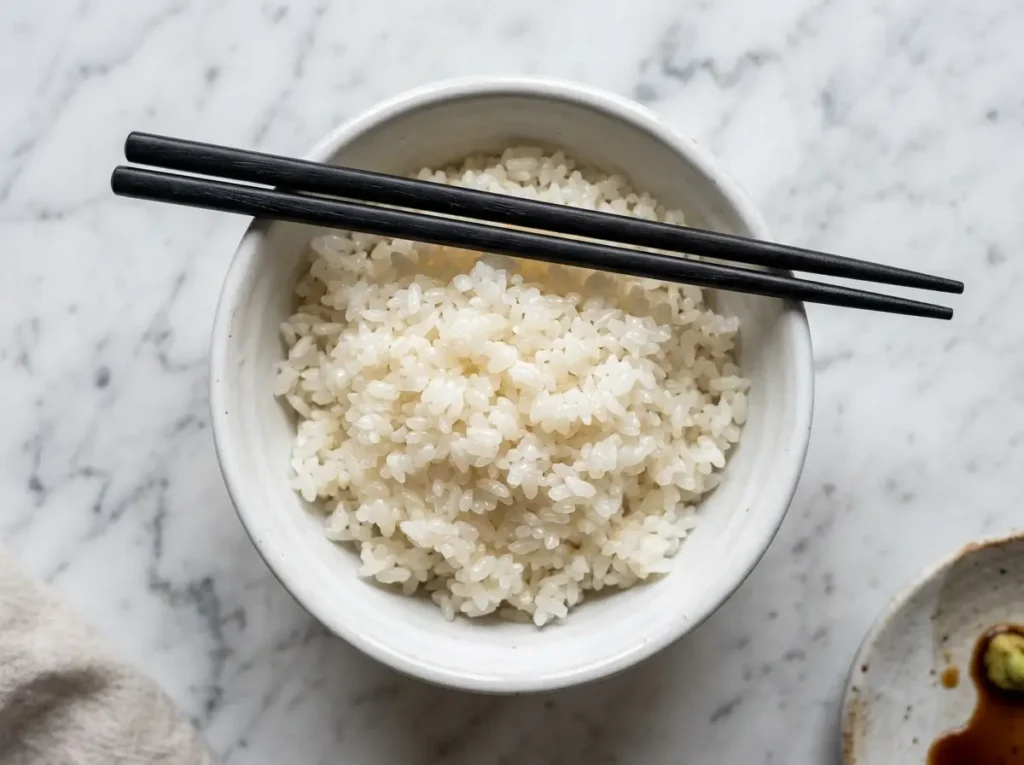
The rice is ready when it’s at room temperature and has a glossy, slightly sticky appearance. Use within 30–60 minutes for best texture — sushi rice dries out quickly.
Sophie’s Tips for Perfect Sushi Rice
- Temperature matters: Season the rice while it’s still hot — the vinegar absorbs into the grains only when they’re warm.
- Use a wide bowl: The more surface area, the faster the rice cools and the better the texture.
- Don’t refrigerate sushi rice: Cold rice firms up and loses the right texture. Make it and use it within an hour. If you need to hold it, cover with a slightly damp towel at room temperature.
- Taste the vinegar mix before adding: It should taste sour, sweet, and salty — noticeably stronger than you’d want in the final rice, since it gets diluted across all that rice.
- Adjust the ratio: More sugar for sweeter rice (western California rolls style). More vinegar for more tang (traditional Japanese style).
How to Use This Sushi Rice
- How to Use This Sushi Rice
- Sushi rolls (maki) — the classic
- Nigiri — mold into small ovals by hand and top with fish or vegetables
- Hand rolls (temaki) — rolled into a cone shape
- Chirashi bowls — rice in a bowl topped with your favorite ingredients
- Onigiri — shaped into triangles with a filling
- Getting the vinegar balance right makes all the difference. If you’re wondering why sushi recipes always call for unseasoned vinegar, this guide on seasoned vs unseasoned rice vinegar explains exactly which one gives authentic sushi flavor.
Conclusion
Once you master sushi rice, homemade sushi becomes dramatically easier—and honestly, far less expensive than another Friday night takeout order pretending to be “just one roll.”
The glossy finish, gentle tang, and perfect sticky texture are what turn simple rice into real sushi rice. If you enjoy Japanese-style comfort dishes, you might also love these Korean bok choy recipes as an easy side for rice bowls and quick weeknight meals. And if you’re planning a richer comfort-food dinner instead, this guide on what to eat with onion boil gives great pairing ideas for hearty sides and cozy meals.
Frequently Asked Questions
What rice is best for sushi?
Short-grain Japanese rice, specifically labeled ‘sushi rice’ or ‘Japanese short-grain rice.’ Brands like Nishiki, Kokuho Rose, or Tamaki are widely available in the US. Do not use long-grain, jasmine, or arborio rice.
Can I use regular vinegar instead of rice vinegar?
No — regular white vinegar is too harsh and acidic. Rice vinegar has a milder, slightly sweet flavor that’s essential for sushi rice. It’s available in most large grocery stores in the Asian foods section.
Why is my sushi rice too sticky?
Either the rice wasn’t rinsed enough (leaving too much surface starch) or too much water was used. Rinse until the water is nearly clear, and measure your water precisely — the 1:1 ratio of rice to water is important.
Can I make sushi rice without a rice cooker?
Yes — the stovetop method works perfectly. The key is a heavy pot with a tight-fitting lid and strict discipline about not lifting the lid during cooking. The 13 minutes + 10 minutes steam method gives consistent results.
How long can I keep sushi rice?
Sushi rice is best used within an hour of making it. At room temperature, cover with a damp towel to prevent drying. Do not refrigerate — cold ruins the texture. Leftover sushi rice can be used in fried rice the next day.
What rice is best for sushi?
Short-grain Japanese rice, specifically labeled “sushi rice” or “Japanese short-grain rice,” is the best choice for proper texture and stickiness. Brands like Nishiki, Kokuho Rose, or Tamaki are widely available in the US. Do not use long-grain, jasmine, or arborio rice.
For the full flavor balance, choosing the right vinegar matters too—especially understanding the difference between seasoned vs unseasoned rice vinegar, since sushi rice depends on that mild sweetness and acidity.
The Best Sushi Rice Recipe — Restaurant Results at Home
- Total Time: 40 minutes
- Yield: 4 cups 1x
- Diet: Gluten Free
Description
Perfect glossy, subtly tangy sushi rice with the ideal texture for rolls, nigiri, hand rolls, and rice bowls. This method uses the right seasoning ratio and folding technique for restaurant-style results every time.
Ingredients
- 2 cups short-grain Japanese rice (sushi rice)
- 2 cups cold water
- 1 small piece of kombu (optional — 2-inch square of dried kelp)
- 4 tablespoons unseasoned rice vinegar
- 2 tablespoons granulated sugar
- 1½ teaspoons fine salt
Instructions
- Place the rice in a fine-mesh strainer or bowl and rinse under cold water, swirling with your hand, until the water runs almost clear — about 3–4 rinses.
- After rinsing, let the rice soak in clean cold water for 30 minutes if desired.
- Add drained rice and 2 cups fresh cold water to a rice cooker or pot. Add kombu if using.
- For rice cooker: cook on the white rice setting and let steam on warm for 10 minutes.
- For stovetop: bring to a boil, reduce heat to low, cover, and cook for 13 minutes. Remove from heat and steam covered for 10 more minutes.
- While the rice cooks, combine rice vinegar, sugar, and salt in a small saucepan over low heat.
- Stir until the sugar and salt dissolve completely, about 1–2 minutes. Do not boil. Remove from heat and let cool.
- Remove kombu from the cooked rice and transfer hot rice to a large wide non-metallic bowl.
- Pour the sushi vinegar evenly over the hot rice.
- Using a rice paddle or wide spatula, fold the vinegar into the rice using a slicing and turning motion, not stirring.
- At the same time, fan the rice to cool it down until just above room temperature and glossy.
- Use within 30–60 minutes for best texture.
Notes
Use only short-grain Japanese rice for proper texture. Do not refrigerate sushi rice, as cold rice loses the right texture. Cover with a slightly damp towel at room temperature if holding before serving.
- Prep Time: 15 minutes
- Cook Time: 25 minutes
- Category: Side Dish
- Method: Stovetop
- Cuisine: Japanese
Nutrition
- Serving Size: 1 cup
- Calories: 210
- Sugar: 3g
- Sodium: 440mg
- Fat: 0g
- Saturated Fat: 0g
- Unsaturated Fat: 0g
- Trans Fat: 0g
- Carbohydrates: 46g
- Fiber: 1g
- Protein: 4g
- Cholesterol: 0mg
Keywords: sushi rice, sushi, Japanese rice, rice vinegar, homemade sushi, short-grain rice